Ok, so now we have our backups, Windows Server Backup, Azure Backup and SQL backup. If you have used a normal SQL edition and not express you have probably used maintenance plans to notify when the jobs fail but if you use SQL express you need to do it in another way and that is what I’m going to show you.
The principle is that whenever a service fail it will generate a fail event in the event log. By listening to a certain type of event we can then invoke an action when the event occur such as sending an email. To listen to an event we will use Windows Task Scheduler and to send an email we will use Powershell.
First we need to find the fail event ID:s to Windows Server Backup, Azure Backup and SQL backup.
Windows Sever Backup Event ID:s
Here is the event id:s to backup operations in Windows Server Backup, the interesting ones are:
- 4 – Backup finished successfully
- 19 – Backup attempted at ‘%4’ failed to start, error code ‘%5’
- 564 – Backup started at ‘%1’ failed as network target ‘%2’ is not writeable. Please ensure user ‘%3’ has write permissions on the target.
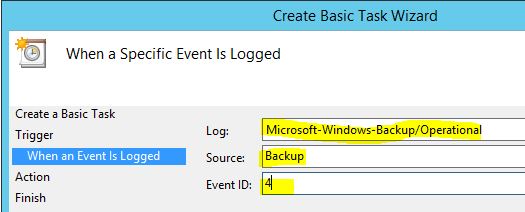
Log: Microsoft-Windows-Backup/Operational
Source: Backup
Microsoft SQL Event ID:s
Here is the complete list of event id:s to SQL, the interesting ones are:
- 3041 – BACKUP failed to complete the command %.*ls. Check the backup application log for detailed messages.
- 18264 – Database backed up. Database: %s, creation date(time): %s(%s), pages dumped: %I64d, first LSN: %s, last LSN: %s, number of dump devices: %d, device information: (%s). This is an informational message only. No user action is required.
Log: Application
Source: MSSQLSERVER
Azure Backup Event ID:s
The list of event id:s to Azure Backup. The interesting ones are:
- 120002 The backup operation failed
- 170017 The backup failed as the total size of the data that has been backed up has exceeded the quota limit for your organization
- 120001 The backup operation was performed successfully
Log: CloudBackup/Operational
Source: CloudBackup
Windows Task Scheduler
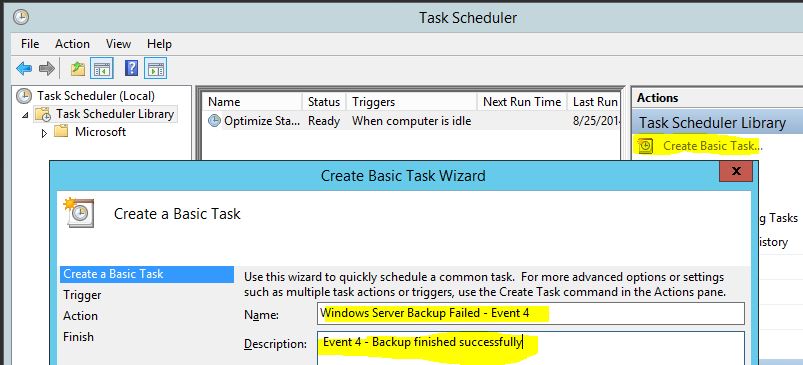
Now we have a bunch of event id:s that we can listen to. To listen after these events we will use the Windows Task Scheduler . Open up Windows Task Scheduler and choose Create Basic Task. Fill in the event you want to listen to.
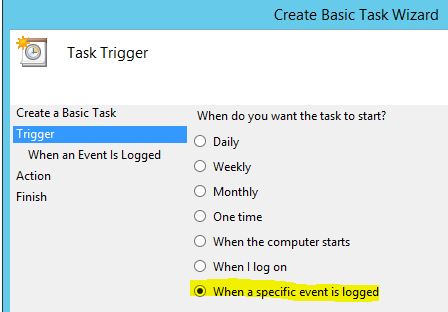
Press next and choose to start when a specific event is logged.
Specify which source and event you want to listen to. When use
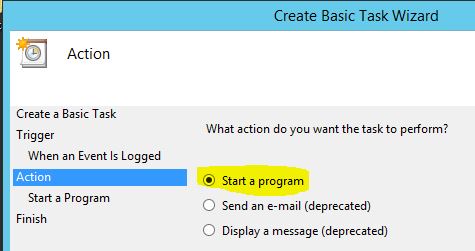
In the next step you will choose action. In Windows Server 2012 the e-mail functionality is deprecated but don’t sweat, we are not going to use it anyway. Instead we are going to use windows powershell to send mail.
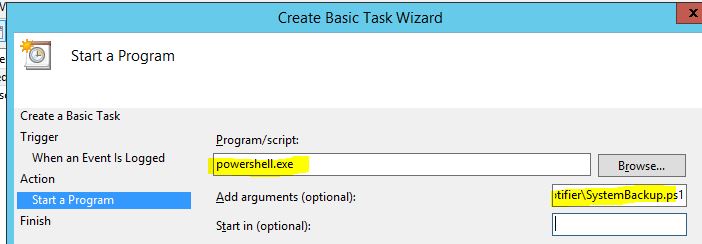
Here we fill in that the task should start powershell.exe and add the following parameters: -executionpolicy remotesigned -File C:\BackupNotifier\SystemBackup.ps1
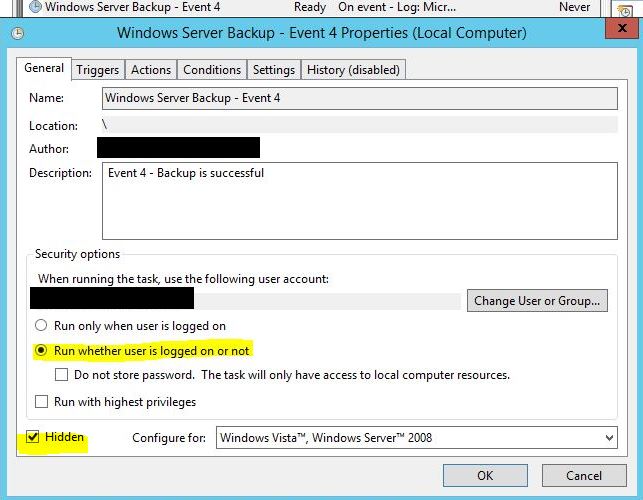
Press next and then finish. As a final touch we right click on the new task and choose properties. Change so the task will be run even if we’re not logged in. Also change Hidden to Yes.
The next step will be create our powershell script.
Send Mail With Powershell
if you haven’t gotten your own SMTP server I recommend to get that before moving on to the next steps.
Create the folder C:\BackupNotifier\
The idea is to launch a powershell script that sends an email with our SMTP server with a given text and subject. But we don’t want to store the password to the SMTP server in the script. The solution is to convert the password to a non-readable password and add it to the script.
Open up powershell and type: read-host -assecurestring | convertfrom-securestring | out-file C:\BackupNotifier\SecureStr.txt
Press enter and write you password to your smtp account and press enter again.
![]()
Now we have solved our password problem by creating a non-readable version of our password that we can use as input to our next script.
To send the mail we will use the powershell command send-mailmessage.
Create the script file by creating a text document and rename it to SystemBackup.ps1 . Then right click on file and choose edit. Paste the following code and change SERVERNAME to the actual servername were you configure this setup. The idea is know which server that has generated the mail when you read it 🙂
Also change SMTPUser to your real SMTP user account and the to/from email address.
$pass = cat C:\BackupNotifier\SecureStr.txt | convertto-securestring
$mycred = new-object -typename System.Management.Automation.PSCredential -argumentlist "SMTPUser",$pass
send-mailmessage -from "SERVERNAME Backup <support@company.se>" -to "Support <support@company.se>" -subject "The Windows Server Backup has succeded" -body "The server SERVERNAME has had a successful Windows Server Backup" -priority High -smtpServer smtp.sendgrid.net -Credential $mycred
Save and exit.
To test our new mail function you can create a batch file that launches the script.
Paste this into a textfile and save it as Testmail.bat.
Powershell.exe -executionpolicy remotesigned -File C:\BackupNotifier\Systembackup.ps1
Pause
After that double-click the file. If everything goes well you will soon receive a mail in your inbox.
This will be the end in my blog series about setting up backups in azure. But my intention is to make a better version of this series, a Set Up Backups In Azure 2.0 were almost everything is automated with powershell. Wouldn’t it be real nice to set up some parameters and then launch a script that does most of the tasks with setting up SQL backups, Windows Server Backups and Azure backup and it is almost completely automated? Not to mention a huge time saver! Hopefully someone is stupid enough to publish the code so you won’t have to create it yourself 😉 Lets hope about a bright future soon 🙂
